In the previous post, we learned how to configure OSPF default routing and the rules that apply to its configuration.
Today we will discuss the enhancements that can be applied to OSPF Default Routing.
Ok, so far we know that the “default-information originate” command is used to generate a default route into the OSPF domain. If the default route is not present in the routing table, then it won’t be generated. However, we can modify this behavior by adding the “always” keyword at the end of the command.
Now, there are situations when is required generating the default route only if a condition matches specific criteria. There is where OSPF Conditional Default Routing enters to play.
Let’s use the following topology for the examples:

Here you can download the diagram and configuration files: OSPF-Default Routing II
OSPF Conditional Default Routing:
OSPF Conditional Default Routing is configured by adding a pre-defined route-map with the desired conditions to the default-information originate command in the OSPF process definition.
By using route map its possible defining matching conditions such as:
- Match if a specific ip address or prefix is present in the routing table.
- Match if the source of a specific ip address or prefix is a specific ip address or interface.
- Match if the source protocol of a specific address or prefix is an IGP or static route or connected.
- Match if the route type is external (E1/E2), internal (Intra/inter-area), nssa-external or locally originated.
- Match the metric value of a specific address or prefix with a specified value.
Combinations of the conditions described above are also possible.
Ok, time for the examples.
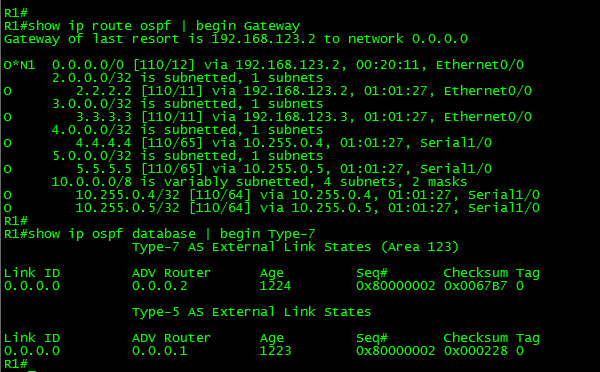
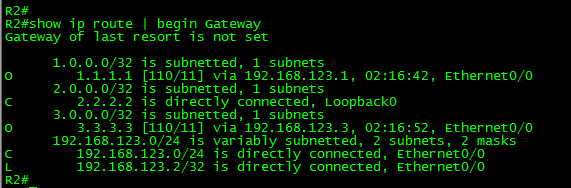
First, let’s take a look to the routing table in the OSPF domain:


As can be seen in the above outputs, R1 has routes from R2 and R3. It also has the route 4.4.4.4/32 redistributed from EIGRP. The routers R2 and R3 are receiving the default route generated by R1. Both routers also have the external routes redistributed from EIGRP.
Goal 1:
Configure OSPF default routing in such way that R2 and R3 receive the default route from R1 only if the route 4.4.4.4/32 is present in the routing table.
Let’s proceed with the configuration:
In R1:
!
ip prefix-list L0-R4 seq 5 permit 4.4.4.4/32
!
route-map CONDITIONAL-DEFAULT permit 10
match ip address prefix-list L0-R4
!
router ospf 1
default-information originate always route-map CONDITIONAL-DEFAULT
exit
!
The above configuration permits the default route to be originated in OSPF only if the route 4.4.4.4/32 is present in the routing table.
Because the prefix 4.4.4.4/32 currently exists in R1’s routing table, then the default route is generated.
Now, let’s stop the advertising of the Loopback 0 in R4 and check the routing table in R2 to verify if the condition works.
In R4:
!
router eigrp 100
no network 4.4.4.4 0.0.0.0
exit
!

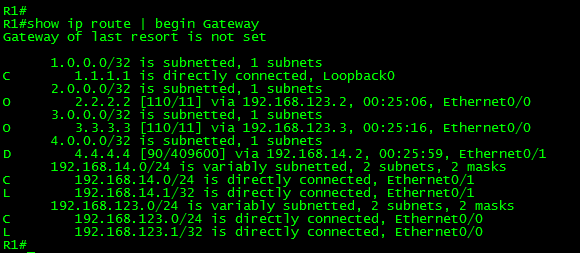
As can be seen in the above output, now the default route is no longer present in the routing table.
Goal 2:
- Configure a static default route in R1 pointing to R4.
- Configure OSPF default routing in such way that R2 and R3 receive the default route from R1 only if the link to R4 is up.
First, let’s clear the previous configuration in R1 and create the static default route.
In R1:
!
router ospf 1
no default-information originate
default-information originate
exit
!
no ip prefix-list L0-R4 seq 5 permit 4.4.4.4/32
no route-map CONDITIONAL-DEFAULT permit 10
!
ip route 0.0.0.0 0.0.0.0 192.168.14.2
!
Now, to verify if the interface is in UP/UP status, what can be done is check if the “Connected” route is in the routing table. If a Layer 2 failure occurs with the connection to R4, then the connected route is removed from the routing table.

Let’s configure the condition:
In R1:
!
ip access-list standard ETH-01-UP
permit 192.168.14.0 0.0.0.255
exit
!
route-map CONDITIONAL-DEFAULT permit 10
match ip address prefix-list L0-R4
exit
!
router ospf 1
default-information originate route-map CONDITIONAL-DEFAULT
exit
!
The above configuration permits the default route to be originated in OSPF only if the connected route 192.168.14.0/24 is present in the routing table. If there is a Layer 2 failure, then the default route won’t be generated.
To test the above configuration I’ll disconnect the cable connecting to R2 and then I’ll check the routing tables in R1 and R2 respectively.
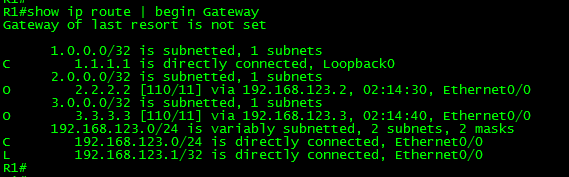
As can be seen in the output, as soon the interface in R1 was disconnected from R1, “connected” route 192.168.14.0/24 was removed from its routing table. This means that the condition configured before does not match the requirements anymore. Thus, the default route is no longer advertised to R2 and R3.
Pretty cool, huh? The configuration worked as expected in this situation.
Now, what if is not a Layer 2 failure? In other words, let’s say the interface remains up but there is no connectivity to the desired destination through it?
Well, in this type of situations is where Reliable Conditional Default Routing enters to play.
OSPF Reliable Conditional Default Routing:
OSPF Reliable Conditional Default Routing this is achieved through the combination of Conditional Default Routing and Cisco IP SLA with Enhanced Object Tracking (EOT).
Goal 3:
Configure OSPF default routing in such way that R2 and R3 receive the default route from R1 only if there is end-to-end reachability to R4.
Let’s start by removing the previous configuration in R1.
In R1:
!
router ospf 1
no default-information originate
default-information originate
exit
!
no ip access-list standard ETH-01-UP
no route-map CONDITIONAL-DEFAULT permit 10
no ip route 0.0.0.0 0.0.0.0 192.168.14.2
!
Ok, the next step is configuring the IP SLA.
In R1:
!
ip sla 1
icmp-echo 192.168.14.2
threshold 3000
timeout 4000
frequency 5
exit
!
ip sla schedule 1 life forever start-time now
!
The above configuration created the ip sla entry 1, which will send icmp packets every 5 seconds to the ip address 192.168.14.2 (interface Ethernet0/1 of R4) with a threshold of 3 seconds and timeout of 4 seconds. The scheduling has enabled the ip sla entry 1 with no expiration.
The next step is configuring the Enhanced Object Tracking.
In R1:
!
track 1 ip sla 1 reachability
!
Let’s stop here and take a look to the IP SLA and the Enhanced Object Tracking status.

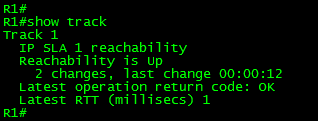
As can be seen in the above outputs, the IP SLA is working and returning success operation. Also, the Enhanced Object Tracking is returning “UP” reachability status.
Let’s continue.
Now that we have the IP SLA and the Enhanced Object tracking configured, we have to create the condition.
Now, for the condition to work, we will need something to match. Right?
The next step is configuring a placeholder to create a prefix in the routing table and use the enhanced object tracking to validate this route.
In R1:
!
ip route 169.255.0.4 255.255.255.255 Null0 track 1
!
The above configuration created a default route for the ip address 169.255.0.4 (link-local RFC 6890) pointing to the trash can. The track 1 command forces the route to remain valid while the enhanced object tracking returns reachability UP.

As can be seen in the above output, the placeholder is working. The prefix 169.255.0.4/32 is present in the routing table because the enhanced object tracking is returning UP status.
Let’s shut down the interface Ethernet0/1 in R4 and let’s take a look at the routing table again.
In R4:
!
interface Ethernet0/1
shutdown
exit
!

As can be seen in the above output, the enhanced object tracking changed the status to Down, also, the prefix 169.255.0.0/32 was removed from the routing table.
Let’s enable back the interface in R4.
In R4:
!
interface Ethernet0/1
no shutdown
exit
!

As can be seen in the above output, the placeholder is working as expected.
Now we have to configure the route-map and attach it to the default-information originate command.
In R1:
!
ip prefix-list PLACEHOLDER seq 5 permit 169.255.0.4/32
!
route-map R-C-DEFAULT permit 10
match ip address prefix-list PLACEHOLDER
!
router ospf 1
default-information originate always route-map R-C-DEFAULT
exit
!
The above configuration permits the default route to be generated if the prefix 169.255.0.4/32 (Placeholder) is present in the routing table. The always keyword was used because the default route was not present in the routing table.
Finally, let’s shut down again the interface Ethernet 0/1 in R4 and check the routing table in R2:
In R4:
!
interface Ethernet0/1
shutdown
exit
!

As can be seen in the above output, after the interface was disabled in R4, the default route was removed in R2. The OSPF Reliable Conditional Default Routing was properly configured.
It is time to close this long post. In the next one, we will discuss OSPF Stub Router Advertisement.
Thank you for visiting.